I tried ChatGPT for Arduino - It’s Surprising
Learn how to use AI’s help to learn Arduino programming faster, find bugs, and understand programs line-by-line!


Introduction
Learning embedded programming was difficult. I found some starter examples that helped, but when I tried to build my own code, I struggled to find answers to my questions. That's when I looked for help.
Getting good help is not easy. I posted questions in forums but the responses took a long time. The helpful responses were not consistent, some were challenging, and some even mocked my coding skills😢. It just left me more confused and frustrated 😒
This leads to the ironic question: Can technology answer the questions I have about coding so I can get answers without getting criticized? Can Artificial intelligence such as ChatGPT help find answers immediately? Can it help me find a good explanation for complex codes? 🤔
In this article, we'll play around with the ChatGPT AI app. It's just like texting a friend! We'll ask it to write some Arduino code for us and see how it can help us find and fix bugs. Later on, we'll use ChatGPT to build a Wokwi Arduino project and check out some examples of how it can quickly provide complete answers.
Let's get started!
Okay, ChatGPT! Build me the Arduino code
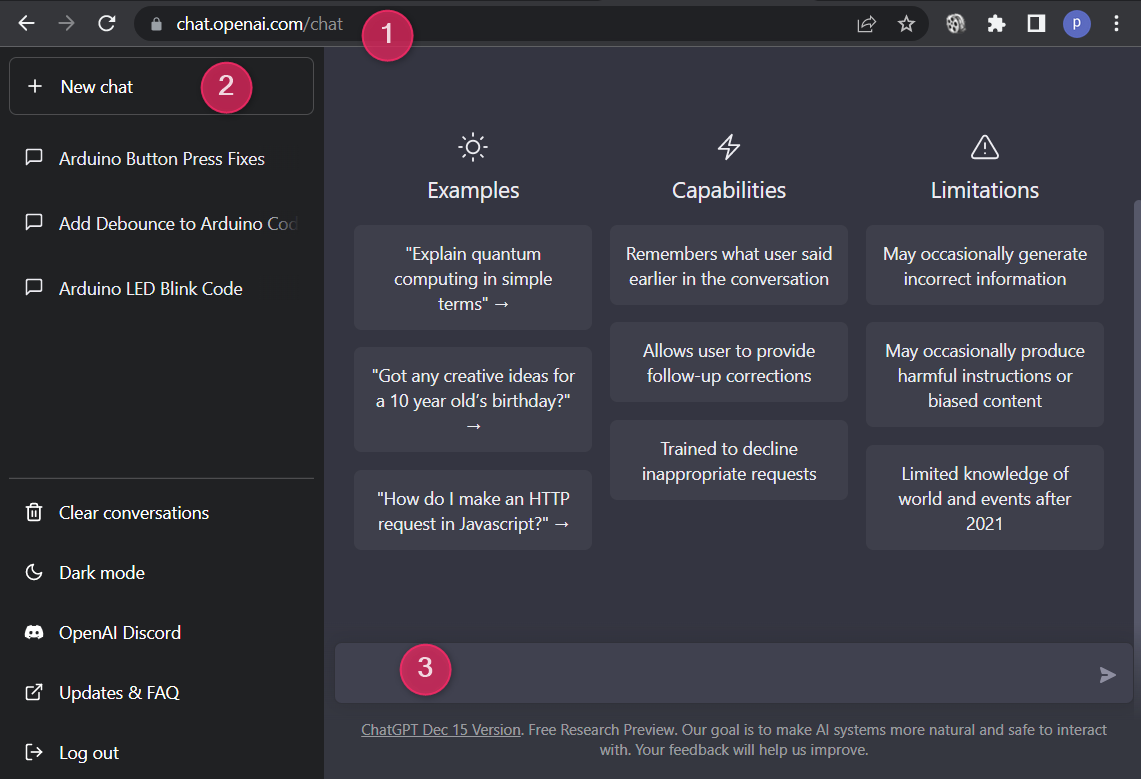
In this section, let’s see how we can build a few Arduino examples using ChatGPT. If it’s your first time using ChatGPT, visit this link and create an account to start.
Once you’ve created an account, you can start chatting with the application by following the steps below:
- Visit the site.
- Click the + New chat button.
- A text field will appear. Type your query, then send.
Arduino LED Blink project using ChatGPT
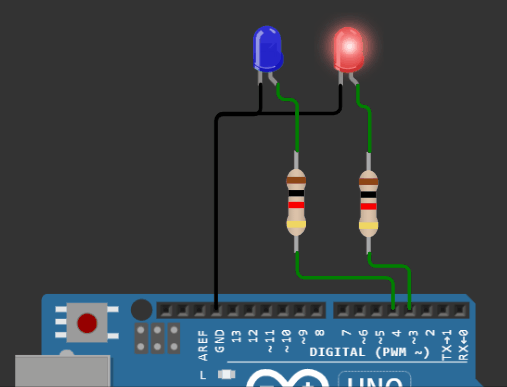
Instead of starting with the typical Arduino tutorial of making an LED blink, let's challenge ChatGPT by asking it to generate an Arduino code for blinking two LEDs in sequence. Here’s a prebuilt project where you can test the code. You can copy and paste the code that ChatGPT will generate into the editor window and test it.
I entered the query below in the chat window.
Build an Arduino code to blink two LEDs alternatively every 500 ms. The LEDs are connected to pins 3 and 4.
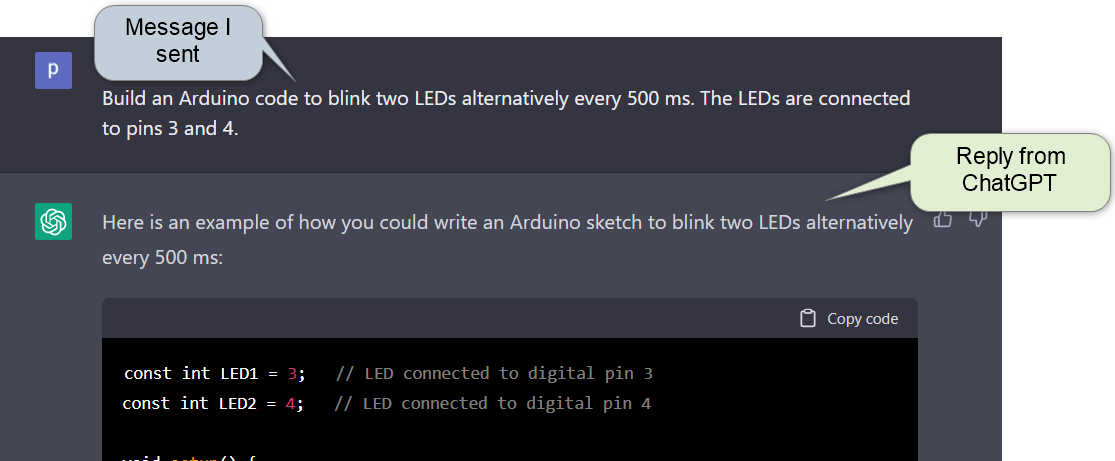
Here’s the code provided by ChatGPT.
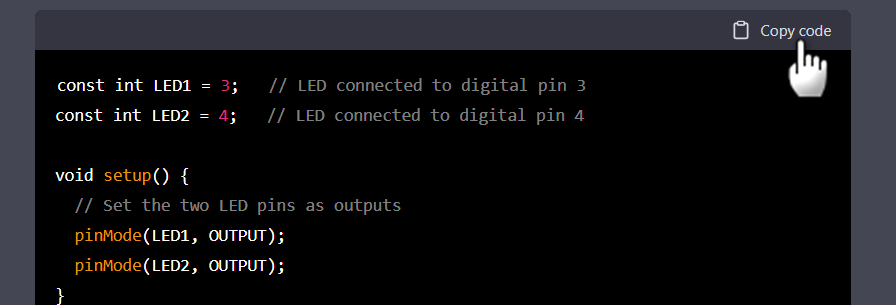
const int LED1 = 3;   // LED connected to digital pin 3
const int LED2 = 4;   // LED connected to digital pin 4

void setup() {
  // Set the two LED pins as outputs
  pinMode(LED1, OUTPUT);
  pinMode(LED2, OUTPUT);
}

void loop() {
  // Turn on LED1
  digitalWrite(LED1, HIGH);
  // Turn off LED2
  digitalWrite(LED2, LOW);
  // Wait for 500 ms
  delay(500);

  // Turn on LED2
  digitalWrite(LED2, HIGH);
  // Turn off LED1
  digitalWrite(LED1, LOW);
  // Wait for 500 ms
  delay(500);
}
Note how simple and precise comments are also included in the code. ChatGPT also included additional notes to explain the code it generated:
“This sketch will turn on one LED, turn off the other LED, wait for 500 ms, then turn on the other LED and turn off the first LED. This will repeat indefinitely.
Note that this code assumes that the LEDs are connected to digital pins 3 and 4 and that they are active-low (meaning they turn on when the digital pin is set to LOW and turn off when the digital pin is set to HIGH). If your LEDs are connected differently or are active-high, you may need to modify the code accordingly.”
As a beginner, if you posted this question in a forum or online community, you would be lucky to have such a clear and detailed answer. Also, you'll usually have to wait for hours or days. With ChatGPT, you get answers instantly without the risk of being mocked or told to just google it.
Back to the project at hand, let’s copy the code and paste it into the Wokwi project template shared earlier.
Here’s the simulated output.
Great! The Arduino code generated by ChatGPT is not only functional, but it is also well-organized and includes helpful explanations. Let's see one more example.
Arduino Buzzer project using ChatGPT
In this example, let’s build an Arduino project which plays a melody on the buzzer connected to pin 3.
Here’s the query sent to ChatGPT.
build arduino code to create a music using a buzzer connected to pin 3
ChatGPT created the “Twinkle Twinkle little star” melody. I copied the code generated by the ChatGPT app into the Wokwi example project. Follow this link to play with the simulation.
The generated code uses the shift-left operator ( << ). You can ask ChatGPT to explain shift operators to you or ask for other options besides shift operators.
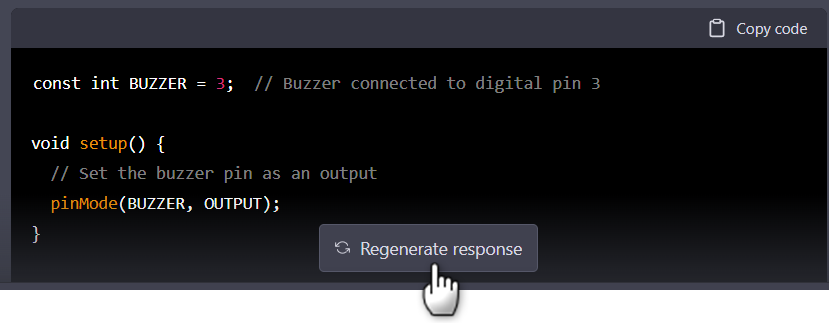
Note: For every query, the response may be different. Clicking the Regenerate response button allows you to see if ChatGPT can generate a different response. This way, you not only find a more suitable response but also learn different methods to tackle the same problem. You can ask ChatGPT to explain the differences to expand your repertoire of knowledge.
LED dimmer project using potentiometer
In this example, let’s connect a potentiometer and an LED to the Arduino board. We’ll control the brightness of the LED using the potentiometer.
Here’s the query I sent to ChatGPT.
Write a code to connect potentiometer to analog A0 and led to pin 3 of arduino
Here’s the response from ChatGPT.
“Here is some sample code that demonstrates how to connect a potentiometer to the analog input A0 and an LED to digital output pin 3 on an Arduino.”
const int potentiometerPin = A0;
// potentiometer is connected to analog pin A0
const int ledPin = 3;
// LED is connected to digital pin 3

void setup() {
  pinMode(ledPin, OUTPUT);
  // set the LED pin as an output
}

void loop() {
  // read the value of the potentiometer
  int potentiometerValue = analogRead(potentiometerPin);

  // map the potentiometer value to a range suitable for the LED
  int ledBrightness = map(potentiometerValue, 0, 1023, 0, 255);

  // set the brightness of the LED
  analogWrite(ledPin, ledBrightness);
}
The soultion was apt. You can verify the functionality of the program above easily on Wokwi here.
Okay, ChatGPT! Can you explain this Arduino code?
In this section, we’ll explore how ChatGPT can help us understand the Arduino code.
Example 1 - Analog read example code
We’ll use the Arduino code below as part of the query.
“Explain me the below Arduino code line-by-line”
void setup() {
  Serial.begin(115200);
  pinMode(A0, INPUT);
}

void loop() {
  int value = analogRead(A0);
  Serial.println(value);
  delay(100);
}
Here’s the response from ChatGPT:
Certainly! Here’s an explanation of each line of code:
void setup() {This line of code defines the setup() function. The setup() function is called once when the Arduino board is powered on or reset. It is typically used to initialize variables, pin modes, and other setup tasks.
Serial.begin(115200);This line of code initializes the serial communication at a baud rate of 115200 bits per second. This is used to send data from the Arduino board to a computer or other device over a serial connection.
pinMode(A0, INPUT);This line of code sets the pin mode for analog input pin A0 to INPUT. This means that the pin will be used to read input values from sensors or other devices.
void loop() {This line of code defines the loop() function. The loop() function is called repeatedly after the setup() function has completed. It is used to perform tasks that need to be repeated indefinitely, such as reading sensor values or controlling outputs.
int value = analogRead(A0);This line of code reads an analog value from pin A0 and stores it in a variable called value. The analogRead() function converts the analog voltage on the pin to a digital value between 0 and 1023.
Serial.println(value);This line of code prints the value of value to the serial connection. The println() function adds a newline character at the end of the output, so the value will be printed on a new line each time it is sent.
delay(100);This line of code causes the Arduino to pause for 100 milliseconds (1/10th of a second) before continuing to the next iteration of the loop() function. This is used to slow down the loop and make the output more readable.
As you can see, the ChatGPT application does a pretty good job at explaining basic code.
Example 2 - DHT22 sensor example on Wokwi home page
In this example, let’s send a query about the DHT22 sensor’s code. Here’s the received response.
“Certainly! Here is an explanation of each line of code:
#include "DHTesp.h"This line of code includes the DHTesp library, which provides functions for reading temperature and humidity values from a DHT22 sensor. The library must be installed in your Arduino development environment for this code to work.
const int DHT_PIN = 15;This line of code defines a constant integer called DHT_PIN and sets its value to 15. The DHT_PIN constant is used to specify which digital pin the DHT22 sensor is connected to on the ESP32 board.
DHTesp dhtSensor;This line of code creates an instance of the DHTesp class called dhtSensor. The DHTesp class is part of the DHTesp library and provides functions for reading temperature and humidity values from a DHT22 sensor.
void setup() {
  Serial.begin(115200);
  dhtSensor.setup(DHT_PIN, DHTesp::DHT22);
}
This is the setup() function, which is called once when the Arduino board is powered on or reset. It initializes the serial communication at a baud rate of 115200 bits per second, and sets up the dhtSensor object to read from the DHT22 sensor on pin DHT_PIN.
  void loop() {
  TempAndHumidity data = dhtSensor.getTempAndHumidity();
This is the loop() function, which is called repeatedly after the setup() function has completed. It uses the getTempAndHumidity() function of the dhtSensor object to read the temperature and humidity values from the DHT22 sensor. The values are returned as a TempAndHumidity struct, which is stored in a variable called data.
  Serial.println("Temp: " + String(data.temperature, 2) + "°C");
  Serial.println("Humidity: " + String(data.humidity, 1) + "%");
  Serial.println("---");
This block of code prints the temperature and humidity values to the serial connection. The temperature and humidity fields of the data struct are converted to strings using the String() function, and the resulting strings are concatenated with other text to create the final output string. The println() function is used to print the string to the serial connection and add a newline character at the end.
  delay(1000);
}
This line of code causes the Arduino to pause for 1000 milliseconds (1 second) before continuing to the next iteration of the loop() function. This is used to slow down the loop and make the output more readable.
Okay, ChatGPT! Please help me fix Arduino code 😨
I believe that ChatGPT’s capabilities that we explored previously are helpful in your Arduino learning journey. On top of that, did you know that ChatGPT can help you fix common errors as well?
The bug🪲 fix feature can help you save time and also get relevant answers immediately. No need to wait for a long time to get answers on how to resolve your code’s problem.
Real-life example 1
Problem: https://forum.arduino.cc/t/push-button-question/237365
I sent the same text posted in the forum to ChatGPT.
Hello, I am using a pushbutton trigger. I would like to know how to tell the arduino to ignore the input unless it persists for more than a half second. ( if I quickly push and release, I want nothing to happen, but If I hold for at least 1/2 second, I want it to trigger) I keep getting some noise that sets it of randomly. My code and setup basically looks like this with relays instead of led outputs.
```
#define relay1 = 11
#define relay2 = 12
#define relay3 = 7
const int trigger = 9;
int triggerState = 0;

void setup() {
  pinMode(trigger, INPUT);
}

void loop()  {
  triggerState = digitalRead(trigger);

  if (triggerState == HIGH) {

    digitalWrite(relay1, HIGH);  // relay1 is triggered
    delay(1000);

  }  //End of if()
  else {
    digitalWrite(relay3, LOW);
    digitalWrite(relay2, LOW);
    digitalWrite(relay1, LOW);
  }
} //End of loop()
```
Here is the response from the ChatGPT.
“To make the Arduino ignore the input unless it persists for more than a half second, you can use a variable to store the time at which the button was first pressed, and then check if enough time has elapsed before triggering the relay. Here is an example of how you can do this:
#define relay1 = 11
#define relay2 = 12
#define relay3 = 7
const int trigger = 9;
int triggerState = 0;

// Declare a variable to store the time at which the button was pressed
unsigned long buttonPressTime;

void setup() {
  pinMode(trigger, INPUT);
}

void loop()  {
  triggerState = digitalRead(trigger);

  // Check if the button has just been pressed
  if (triggerState == HIGH && buttonPressTime == 0) {
    // Store the time at which the button was pressed
    buttonPressTime = millis();
  }

  // Check if the button is still pressed and enough time has elapsed
  if (triggerState == HIGH && millis() - buttonPressTime > 500) {
    digitalWrite(relay1, HIGH);  // relay1 is triggered
    delay(1000);
  }  //End of if()
  else {
    // Reset the button press time and turn off the relays
    buttonPressTime = 0;
    digitalWrite(relay3, LOW);
    digitalWrite(relay2, LOW);
    digitalWrite(relay1, LOW);
  }
} //End of loop()
In this code, the millis() function is used to get the current time in milliseconds. The buttonPressTime variable is initialized to 0, which means that the button has not been pressed. When the button is pressed, buttonPressTime is set to the current time.
Then, in the second if statement, the elapsed time since the button was pressed is checked using millis() - buttonPressTime. If the elapsed time is greater than 500 milliseconds (1/2 second), the relay is triggered. If the button is released or the elapsed time is less than 500 milliseconds, the buttonPressTime variable is reset to 0 and the relays are turned off.”
The suggested answer is exactly what I was thinking. The way it presents the suggestion is impressive. It is great to have a complete code example instead of just a few incomplete ideas.
Real life example 2
Let’s see another problem statement from the Arduino forum. I used the exact same question for the query and here is the response I got from ChatGPT.
"To make the relay stay on until the weight has been met, you can remove the if statement that checks the button state, and instead use a separate variable to keep track of whether the relay is currently on or off.
Here is an example of how you can modify the code to achieve this behavior:
#include "HX711.h"

#define calibration_factor -9620.0 //This value is obtained using the SparkFun_HX711_Calibration sketch

#define DOUT  3
#define CLK  2


const int buttonPin = 4; // pin assign to push button
int buttonState = 0;

HX711 scale;

// Declare a variable to keep track of the relay state
bool relayOn = false;

void setup() {
  pinMode(12, OUTPUT); // pin assign to relay module.

  pinMode(buttonPin, INPUT_PULLUP);

  Serial.begin(9600);
  Serial.println("HX711 scale demo");

  scale.begin(DOUT, CLK);
  scale.set_scale(calibration_factor); //This value is obtained by using the SparkFun_HX711_Calibration sketch
  scale.tare(); //Assuming there is no weight on the scale at start up, reset the scale to 0

  Serial.println("Readings:");

  // Set the relay to the off state
  digitalWrite(12, LOW);
}

void loop() {
  // Read the button state
  buttonState = digitalRead(buttonPin);

  // Read the weight
  float i = scale.get_units();
  float wt = (float)i;

  // If the button is pressed and the relay is off, turn the relay on
  if (buttonState == LOW && !relayOn) {
    digitalWrite(12, HIGH);
    relayOn = true;
  }

  // If the weight is greater than or equal to 10 and the relay is on, turn the relay off
  if (wt >= 10 && relayOn) {
    digitalWrite(12, LOW);
    relayOn = false;
  }

  Serial.print(scale.get_units(), 3); //scale.get_units() returns a float with 3 decimcal place
  Serial.println();
}
“In this modified version of the code, the relayOn variable is used to keep track of whether the relay is currently on or off. When the button is pressed and the relay is off, the relay is turned on and the relayOn variable is set to true.
When the weight is greater than or equal to 10 and the relay is on, the relay is turned off and the relayOn variable is set to false. This allows the relay to stay on until the weight has been met, and then turn off until the button is pressed again.”
The solution provided by ChatGPT was effective and easy to understand. The brief notes at the beginning outlined the approach and the accompanying code explained how it worked. Overall, it was a comprehensive response that met the author's needs.
“My ability to understand and interpret questions and provide accurate answers may be limited by the complexity of the topic, the wording of the question, or other factors. If I am unable to provide a satisfactory answer to your question, please feel free to ask for clarification or additional details, and I will do my best to assist you.”
Okay, ChatGPT! Rewrite my Code
You can ask ChatGPT to convert the code from Micropython to Arduino and vice versa. We’ll see an example for both use cases in this section.
MicroPython to Arduino
Let’s take the standard Pi Pico microPython example on the Wokwi home page. The example reads the button status and prints it on the terminal.
Below is the query I sent to ChatGPT.
convert the below micropython code to Arduino code.
```
import machine
import time

button = machine.Pin(6, machine.Pin.IN, machine.Pin.PULL_UP)
while True:
  print("Button state", button.value())
  time.sleep(0.1)
```
“To convert the MicroPython code to Arduino code, you can use the digitalRead function to read the button state, and the Serial.println function to print the button state to the serial connection. Here is an example of how you can do this:
// Include the Arduino digital I/O library
#include "Arduino.h"

// Define the pin number
const int buttonPin = 6;

void setup() {
  // Initialize serial communication
  Serial.begin(9600);

  // Set the button pin as an input with a pull-up resistor
  pinMode(buttonPin, INPUT_PULLUP);
}

void loop() {
  // Read the button state
  int buttonState = digitalRead(buttonPin);

  // Print the button state to the serial connection
  Serial.print("Button state: ");
  Serial.println(buttonState);

  // Delay for 100 milliseconds
  delay(100);
}
“This Arduino code sets up a serial connection and reads the state of the button in a loop. It then prints the button state to the serial connection and waits for 100 milliseconds before repeating the process.”
I’ve created a Wokwi project using the code above. You can follow the link to verify the operation. I changed serial into serial1 so I can see the data on the serial terminal on Pi Pico.
You can work with ChatGPT using similar lines to get the code translated from Arduino to MicroPython.
Okay, ChatGPT! Now build a Wokwi Project
In this section, let’s interact with ChatGPT and ask for a Wokwi project! If this works out, we can get both the Arduino code and the circuit built automatically with the help of ChatGPT.
First, let’s teach ChatGPT about Wokwi’s diagram.json file.
So, I showed ChatGPT how a diagram.json file looks like for a project with a single LED by sending the query below:
This is an example of Wokwi block diagram
{
  "version": 1,
  "author": "Uri Shaked",
  "editor": "wokwi",
  "parts": [
    { "id": "uno", "type": "wokwi-arduino-uno", "top": 120, "left": 20 },
    { "id": "r1", "type": "wokwi-resistor", "top": 67, "left": 115, "rotate": 90, "attrs": {"value": "220"} },
    { "id": "led", "type": "wokwi-led", "left": 120, "top": 0, "attrs": { "color": "red" }}
  ],
  "connections": [
    ["uno:GND.1", "led:C", "black", []],
    ["r1:1", "led:A", "blue", []],
    ["uno:13", "r1:2", "blue", []]
  ]
}
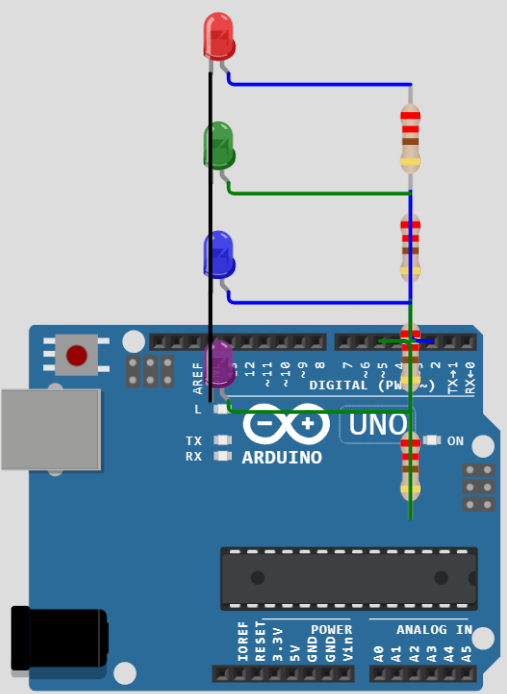
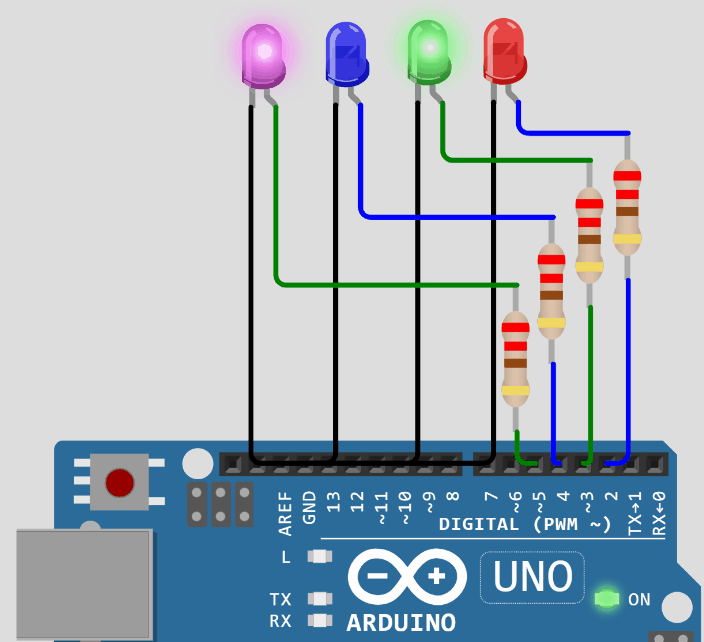
Generate a Wokwi project with 4 colorful LEDs followed by an arduino code that blinks two alternate LEDs every 500 ms
The code generated by ChatGPT for the diagram.json file is as shown below.
{
  "version": 1,
  "author": "Your Name",
  "editor": "wokwi",
  "parts": [
    { "type": "wokwi-arduino-uno", "id": "uno", "top": 191.18, "left": 32.77, "attrs": {} },
    { "type": "wokwi-led", "id": "led1", "top": 0, "left": 120, "attrs": { "color": "red" } },
    { "type": "wokwi-led", "id": "led2", "top": 60, "left": 120, "attrs": { "color": "green" } },
    { "type": "wokwi-led", "id": "led3", "top": 120, "left": 120, "attrs": { "color": "blue" } },
    { "type": "wokwi-led", "id": "led4", "top": 180, "left": 120, "attrs": { "color": "purple" } },
    {
      "type": "wokwi-resistor",
      "id": "r1",
      "top": 63.81,
      "left": 221.39,
      "rotate": 90,
      "attrs": { "value": "220" }
    },
    {
      "type": "wokwi-resistor",
      "id": "r2",
      "top": 127,
      "left": 215,
      "rotate": 90,
      "attrs": { "value": "220" }
    },
    {
      "type": "wokwi-resistor",
      "id": "r3",
      "top": 187,
      "left": 215,
      "rotate": 90,
      "attrs": { "value": "220" }
    },
    {
      "type": "wokwi-resistor",
      "id": "r4",
      "top": 247,
      "left": 215,
      "rotate": 90,
      "attrs": { "value": "220" }
    }
  ],
  "connections": [
    [ "uno:GND.1", "led1:C", "black", [] ],
    [ "r1:1", "led1:A", "blue", [] ],
    [ "uno:2", "r1:2", "blue", [] ],
    [ "uno:GND.1", "led2:C", "black", [] ],
    [ "r2:1", "led2:A", "green", [] ],
    [ "uno:3", "r2:2", "green", [] ],
    [ "uno:GND.1", "led3:C", "black", [] ],
    [ "r3:1", "led3:A", "blue", [] ],
    [ "uno:4", "r3:2", "blue", [] ],
    [ "uno:GND.1", "led4:C", "black", [] ],
    [ "r4:1", "led4:A", "green", [] ],
    [ "uno:5", "r4:2", "green", [] ]
  ],
  "dependencies": {}
}
I pasted the generated code above in the diagram.json file. I was happy to see that it has learnt the format and had created 4 LED circuit project. Not clean, but the 4 LEDs are there. Resistors were also added for current limiting.
Here’s the code it generated to drive the LEDs.
const int LED1 = 2;   // LED connected to digital pin 2
const int LED2 = 3;   // LED connected to digital pin 3
const int LED3 = 4;   // LED connected to digital pin 4
const int LED4 = 5;   // LED connected to digital pin 5

void setup() {
  // Set the four LED pins as outputs
  pinMode(LED1, OUTPUT);
  pinMode(LED2, OUTPUT);
  pinMode(LED3, OUTPUT);
  pinMode(LED4, OUTPUT);
}

void loop() {
  // Turn on LED1 and LED3
  digitalWrite(LED1, HIGH);
  digitalWrite(LED3, HIGH);
  // Turn off LED2 and LED4
  digitalWrite(LED2, LOW);
  digitalWrite(LED4, LOW);
  // Wait for 500 ms
  delay(500);

  // Turn on LED2 and LED4
  digitalWrite(LED2, HIGH);
  digitalWrite(LED4, HIGH);
  // Turn off LED1 and LED3
  digitalWrite(LED1, LOW);
  digitalWrite(LED3, LOW);
  // Wait for 500 ms
  delay(500);
}
The output works as expected.
I strongly encourage you to experiment with the tool further in order to fully understand its capabilities. I have personally been using it to discover different approaches to solving coding issues, and I hope you find it as useful as I do.
Conclusion
In this article, we experimented with this really cool tool called ChatGPT. It can help us learn Arduino and coding faster and easier. It's an AI tool that uses natural language processing (NLP) and machine learning (ML) to provide interactive lessons and answer questions about Arduino and coding concepts.
Basically, you can chat with it and it'll help you understand everything from the basics to more advanced stuff. It's a really unique way to learn and it's great for beginners or even experienced people who want to brush up on their skills. Overall, it’s a really helpful resource for learning Arduino and coding.
In my view, ChatGPT can accelerate your learning process, but it cannot substitute for a high-quality book or comprehensive video course.😉
If you have any feedback or suggestions to make the simulator more helpful, you can connect with us on Facebook, Discord, and Twitter.